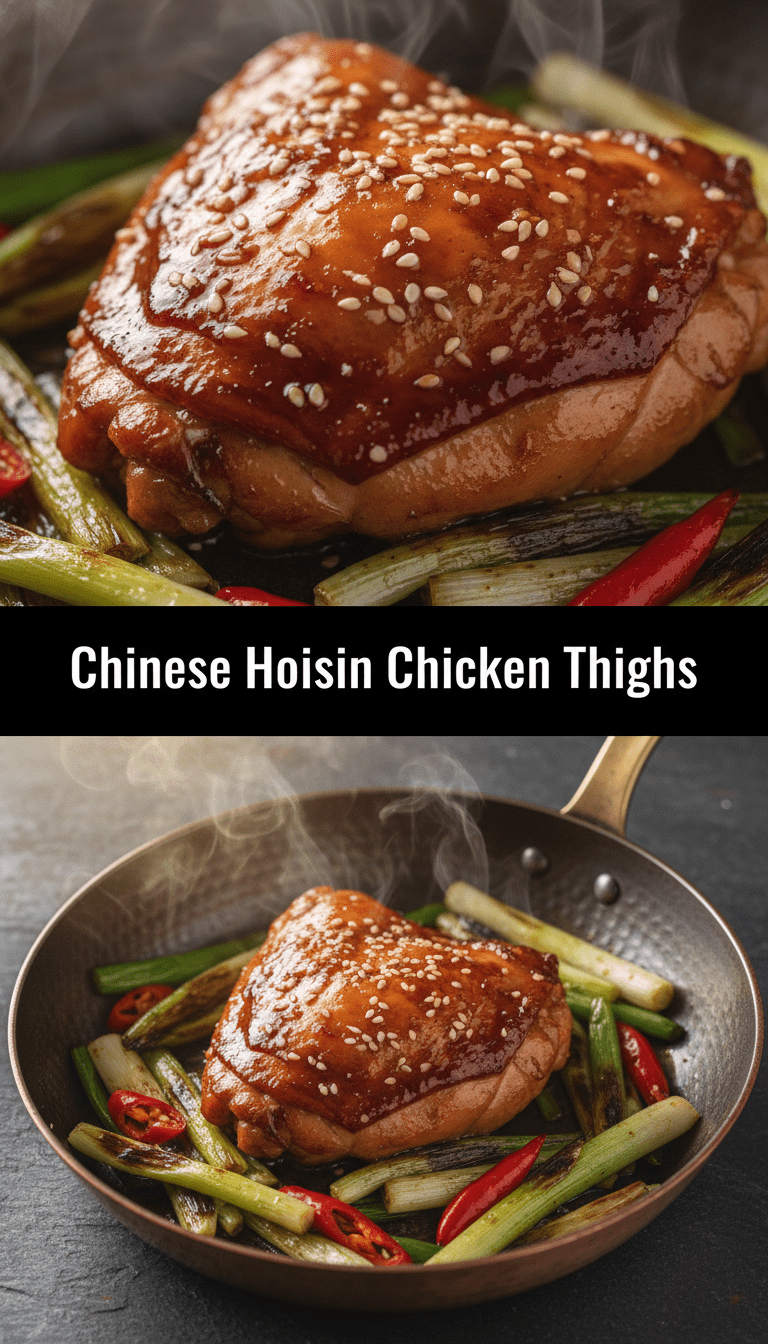
Hey food lovers! Welcome back to my kitchen. Today, we are diving headfirst into a flavor explosion that is guaranteed to become your new go-to weeknight meal: Chinese Hoisin Chicken Thighs. If you love that irresistible sticky, savory-sweet glaze you find in great takeout, prepare to be amazed because this recipe is even better—and it’s incredibly simple to whip up!
Hoisin sauce is the secret weapon here. It’s that rich, dark, slightly sweet, and wonderfully complex sauce that instantly transports you straight to your favorite Chinese restaurant. By pairing it with juicy bone-in, skin-on chicken thighs, we create a dish where the fat renders out, the skin crisps up, and the meat soaks up all that incredible flavor. Let’s get cooking!
Quick Facts
Prep time: 15 minutes
Cooking time: 35-40 minutes
Total time: About 55 minutes
Serving size: 4 people
Why You’ll Love This Recipe
Seriously, what’s not to love?
- Minimal Effort, Maximum Flavor: The prep is fast, and the oven does most of the heavy lifting.
- Perfectly Juicy Meat: Chicken thighs stay moist and tender, even if you overcook them slightly (though we aim not to!).
- That Sticky Glaze: The sauce caramelizes beautifully under the broiler, creating a heavenly, sticky coating.
- Budget-Friendly: Chicken thighs are usually one of the most affordable cuts of meat.
Ingredients You’ll Need
To make these glorious thighs, gather the following goodies:
For the Chicken:
- 8 bone-in, skin-on chicken thighs (about 2.5 to 3 lbs total)
- 1 tablespoon vegetable oil (or any neutral oil)
- 1 teaspoon salt
- 1/2 teaspoon black pepper
For the Hoisin Glaze:
- 1/2 cup Hoisin sauce (the star!)
- 1/4 cup soy sauce (low sodium is fine)
- 2 tablespoons brown sugar (packed)
- 1 tablespoon rice vinegar (adds a nice tang)
- 1 tablespoon minced fresh ginger
- 2 cloves garlic, minced
- 1 teaspoon sesame oil
For Garnish (Optional but highly recommended):
- 1 tablespoon sesame seeds
- 2 scallions (green onions), thinly sliced
Step-by-Step Instructions: Mastering the Glaze
Follow these simple steps, and dinner will be served faster than you think!
Step 1: Prepare the Chicken and Oven
Preheat your oven to 400°F (200°C). Line a rimmed baking sheet with foil or parchment paper for easy cleanup—trust me on this one! Pat the chicken thighs very dry with paper towels. Drying the skin is crucial for getting a nice crisp.
Place the dried chicken thighs on the prepared baking sheet, spacing them out. Drizzle them with the vegetable oil, then sprinkle evenly with salt and pepper.
Step 2: Whisk Up the Magic Sauce
In a medium bowl, whisk together all the ingredients for the Hoisin Glaze: Hoisin sauce, soy sauce, brown sugar, rice vinegar, fresh ginger, minced garlic, and sesame oil. Mix until the brown sugar is mostly dissolved.
Step 3: The First Bake (The Tenderizing Stage)
Pour about two-thirds of the Hoisin glaze over the chicken thighs. Use your hands or tongs to rub the sauce all over the chicken, making sure to get some underneath the skin too.
Place the baking sheet in the preheated oven and bake for 25 minutes. This initial bake allows the chicken to cook through and start tenderizing.
Step 4: The Final Sticky Coat
After 25 minutes, carefully pull the tray out of the oven. Brush the remaining one-third of the fresh, un-cooked glaze over the chicken thighs. This fresh layer ensures maximum stickiness at the end!
Return the chicken to the oven and bake for another 10–15 minutes, or until the internal temperature reaches 165°F (74°C) in the thickest part.
Step 5: Broil for Perfection (Watch Closely!)
For that final, show-stopping sticky char, switch your oven to the broiler setting (high). Move the oven rack to the upper-middle position. Broil the chicken for 1 to 3 minutes. Keep a very close eye on it! Hoisin sauce contains sugar and burns easily. You are looking for beautifully dark, bubbly, caramelized spots.
Step 6: Rest and Garnish
Remove the chicken from the oven and let it rest on the tray for about 5 minutes. This keeps the juices locked in. Just before serving, sprinkle generously with sliced scallions and sesame seeds.
Serving Suggestions
These Hoisin Chicken Thighs are robustly flavored and beg for something simple and fresh on the side.
- Steamed Rice: Absolutely essential for soaking up any extra glaze drippings. White rice or brown rice works perfectly.
- Simple Greens: Steamed or lightly sautéed broccoli or bok choy tossed with a tiny drizzle of soy sauce keeps the meal balanced.
- Fresh Salad: A quick cucumber salad dressed with rice vinegar and a pinch of salt offers a nice, cool contrast to the richness of the chicken.
Tips for Customization and Variations
Want to switch things up? Here are a few easy tweaks:
- Make it Spicy: Add 1 teaspoon of chili garlic sauce or a pinch of red pepper flakes to the glaze mixture.
- Different Cuts: This recipe works wonderfully with chicken wings or even boneless, skinless thighs (though you’ll need to reduce the baking time slightly).
- Citrus Boost: Add the zest of one orange to the glaze for a slight ‘Orange Chicken’ flavor profile.
- Slow Cooker Option: You can sear the thighs first, then place them in a slow cooker with the entire glaze mixture. Cook on low for 4-5 hours. If you want a thick glaze, remove the chicken towards the end and simmer the sauce on the stovetop until reduced.
Estimated Nutritional Information (Per Thigh, skin-on)
Please remember this is a rough estimate, as ingredient brands vary widely:
- Calories: 450–550
- Protein: 30g
- Fat: 30g (mostly healthy fats from the skin rendering)
- Carbohydrates: 15g (mainly from the sugars in the glaze)
Frequently Asked Questions (FAQs)
Q1: Can I use chicken breasts instead of thighs?
A: Yes, but chicken breasts dry out much faster. If using breasts, bake at 375°F (190°C) for about 20-25 minutes total, and be extremely careful not to broil them too long, or they will become tough.
Q2: How long does leftover chicken last?
A: Store the cooked Chinese Hoisin Chicken Thighs in an airtight container in the refrigerator for up to 3–4 days. They reheat beautifully in the microwave or a skillet.
Q3: I don’t have fresh ginger/garlic. Can I use the jarred kind?
A: Absolutely! Substitute about 1 teaspoon of jarred minced ginger and 1/2 teaspoon of jarred minced garlic for the fresh amounts listed. The flavor will be slightly milder but still delicious.
Q4: Why do I need to put on a second layer of glaze before broiling?
A: The first layer cooks into the chicken during the main bake. The second layer stays fresher and wetter on the surface, which leads to that perfect, super sticky, shiny caramelization when you hit it with the high heat of the broiler!
Enjoy this amazing, flavor-packed dinner! Happy cooking!