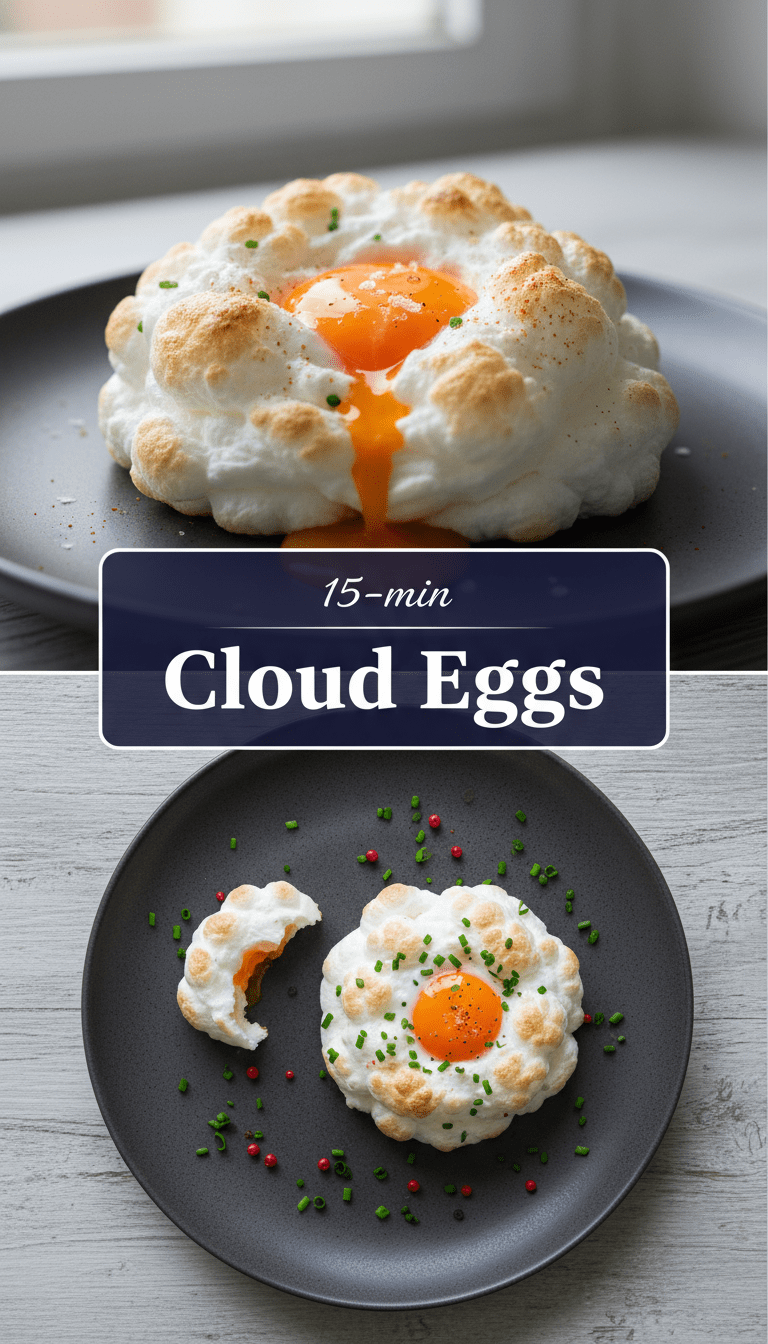
Hello, fellow food lovers! Are you tired of the same old scrambled or fried eggs? Do you crave something light, airy, and utterly beautiful to look at? Well, get ready to have your mind blown because today we are diving into the magical world of Cloud Eggs!
These aren’t just eggs; they’re little puffs of heavenly meringue cradling a perfectly cooked yolk. They look incredibly fancy, but trust me, they are shockingly easy to make. If you can whip egg whites, you can make these! Let’s get whisking!
Quick Facts
Here’s the scoop on how fast this treat comes together:
Prep time: 10 minutes
Cooking time: 12-15 minutes
Total time: Approximately 25 minutes
Serving size: 2 servings (Makes 4 cloud eggs)
Why You’ll Love This Recipe
Forget dense, heavy breakfasts. Cloud Eggs are pure joy on a plate!
- Incredibly Light Texture: The base is crispy and fluffy, almost like savory marshmallows.
- Visually Stunning: They make any brunch table look instantly gourmet.
- Quick & Simple: Minimal ingredients and straightforward steps mean less time fussing and more time enjoying.
- Perfectly Cooked Yolk: You get that satisfying, runny yolk moment every time!
Gather Your Ingredients
You only need a few simple things for this recipe. Feel free to double the recipe if you’re serving a crowd!
- 4 large eggs (separated – yolks and whites)
- 1/4 teaspoon salt (for the whites)
- Pinch of black pepper (for seasoning the yolks)
- 1 tablespoon grated Parmesan cheese (optional, for flavor)
- 1 teaspoon fresh chives or parsley, finely chopped (for garnish)
Let’s Make Magic: Step-by-Step Instructions
The key to successful cloud eggs is patience during the whipping stage.
Step 1: Preheat and Prep
Preheat your oven to a cozy 450°F (230°C). Line a baking sheet with parchment paper. This prevents sticking and makes cleanup a breeze!
Step 2: Separate the Eggs (The Crucial Part!)
Carefully separate the egg whites from the yolks into two separate bowls. Make absolutely sure no trace of yolk gets into the whites, or they won’t whip up properly. Gently place each yolk into a tiny separate container or ramekin so they are ready to go back in later.
Step 3: Whipping Up the Clouds
Pour the egg whites into a clean, large mixing bowl. Add the 1/4 teaspoon of salt. Using an electric hand mixer or a stand mixer with a whisk attachment, beat the whites on medium-high speed until they form stiff, glossy peaks. This means when you lift the whisk, the peaks stand up straight without flopping over. This usually takes about 3 to 5 minutes, depending on your mixer.
Step 4: Flavor and Form
Gently fold in the Parmesan cheese, if using, using a spatula—don’t deflate the air you just whipped in! Divide the meringue mixture into four equal portions on your prepared baking sheet, shaping them into little mounds about 3 inches wide. Use the back of a spoon to create a little well or divot in the center of each mound. This is where the yolk will sit!
Step 5: Baking the Base
Slide the baking sheet into the preheated oven. Bake the egg white “clouds” for about 3 minutes until they start to set and look slightly golden on the edges.
Step 6: Introducing the Yolk
Carefully remove the tray from the oven. Gently spoon one reserved egg yolk into the well of each cloud. Sprinkle the top of the yolk with a tiny pinch of black pepper.
Step 7: Final Bake
Return the baking sheet to the oven and bake for another 3 to 5 minutes. The whites should be firm, and the yolks should still be runny. Keep a close eye on them; overcooking them turns them solid!
Step 8: Garnish and Serve Immediately
Carefully slide your cloud eggs onto a serving plate. Garnish with fresh chives or parsley and enjoy your culinary masterpiece!
Serving Suggestions
Cloud Eggs are fantastic any time of day!
- Serve them atop a bed of lightly dressed arugula or spinach for a lovely lunch salad.
- Pair them with toasted sourdough bread for dipping into that glorious yolk.
- Serve alongside avocado slices and a side of crispy bacon for a complete brunch spread.
Tips for Customization & Variations
Want to jazz up your clouds? Go for it!
- Savory Swirl: Before baking the whites, gently fold in 1 tablespoon of finely chopped cooked bacon or ham.
- Herbal Heaven: Mix in dried herbs like thyme or dill directly into the egg whites.
- Cheesy Goodness: Instead of Parmesan, try a tablespoon of shredded Gruyère or sharp cheddar sprinkled on top of the yolk before the final bake.
- Spicy Kick: Dust the finished yolks with a tiny sprinkle of smoked paprika or a drop of your favorite hot sauce just before serving.
Estimated Nutritional Information (Per serving, 2 cloud eggs)
Please note: This is an estimation and will vary based on exact ingredient measurements and brands used.
Calories: Approximately 140-160
Protein: 10g
Fat: 11g
Carbohydrates: 1g
Frequently Asked Questions (FAQs)
Can I make Cloud Eggs ahead of time?
The egg whites can be whipped a couple of hours in advance and kept covered in the fridge, but they might lose a little volume. It is best to separate the eggs and bake immediately for the fluffiest results. Do not try to bake the whites and then store them—they deflate quickly!
Why didn’t my egg whites whip up?
The number one reason is fat contamination! Ensure your bowl and whisk are completely clean and dry, and that absolutely no yolk sneaks into the whites during separation. Room temperature whites also whip up faster and higher than cold whites.
How do I know when they are done?
The meringue should look golden brown on the peaks and feel firm when lightly touched. The yolk should still wobble slightly when the tray is gently moved. If you prefer a firmer yolk, bake for an extra minute or two.
Enjoy making these beautiful Cloud Eggs! They truly are a showstopper breakfast that tastes even better than they look! Happy cooking!
