Hello, fellow food lovers! It’s that time of year again—the Mid-Autumn Festival is just around the corner, and you know what that means: Mooncakes! These beautiful, rich pastries symbolize reunion and completeness, and while store-bought ones are convenient, nothing beats the flavor and satisfaction of making them yourself.
I know what you might be thinking: Mooncakes seem intimidating! But trust me, with this recipe, we’re breaking down the process into simple, fun steps. Get ready to impress your family and friends with these stunning, homemade delights!
Quick Facts
Here’s a snapshot of what you’ll need to get started:
Prep time: 45 minutes (plus chilling time for the dough)
Cooking time: 15-20 minutes
Total time: Approximately 1 hour 15 minutes (active time)
Serving size: Makes about 10 standard 100g mooncakes
Why You’ll Love This Recipe
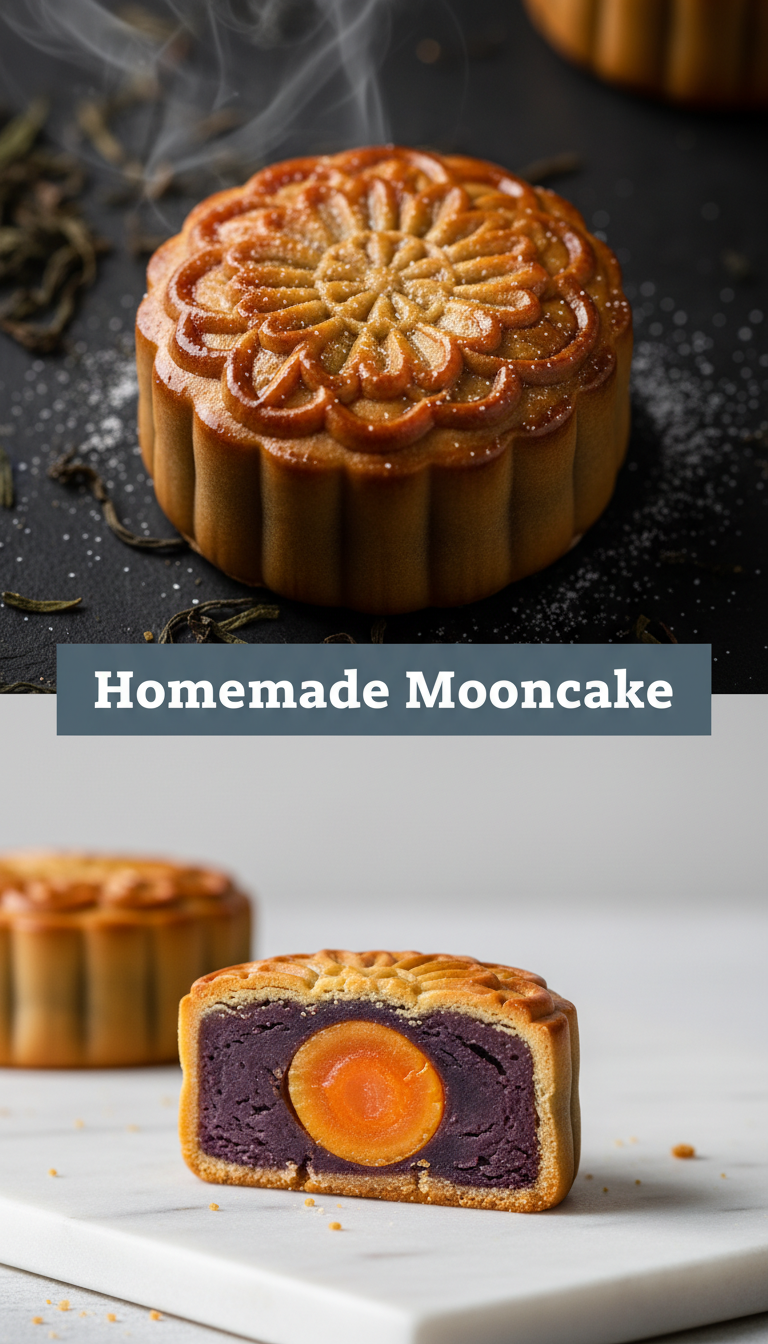
This recipe focuses on the classic Cantonese style mooncake—the kind with a tender, slightly chewy golden crust hugging a sweet, rich filling.
- Authentic Flavor: We nail that perfect balance between the sweetness of the filling and the delicate flavor of the crust.
- Fun to Mold: There’s something incredibly satisfying about pressing that beautiful pattern onto the dough.
- Perfect for Gifting: Homemade always tastes better, and your personalized mooncakes will be treasured gifts!
Ingredients You’ll Need
Making mooncakes requires two main components: the filling and the crust. For simplicity, we are using a ready-made Lotus Seed Paste (Lian Rong) filling, which is widely available online or in Asian grocery stores. If you prefer homemade filling, that’s a whole other adventure!
For the Golden Syrup (The Secret to the Crust!)
- 1 cup Golden Syrup (Invert Syrup) or Brown Rice Syrup (essential for color and texture)
- 1/4 cup Peanut Oil (or vegetable oil)
- 1 teaspoon Food-grade Lye Water (Kansui) – Optional, but highly recommended for traditional texture
- 2 cups All-Purpose Flour
For the Egg Wash
- 1 Large Egg Yolk
- 1 tablespoon Water or Milk
For the Filling & Assembly
- About 1 pound (450g) store-bought Lotus Seed Paste (or preferred filling like red bean paste)
- 10 salted duck egg yolks (optional, for the classic “moon”)
- A mooncake mold (50g or 100g size recommended)
Step-by-Step Instructions: Creating Your Mooncake Magic
Part 1: Preparing the Mooncake Dough
1. Mix the Wet Ingredients: In a large bowl, whisk together the golden syrup, oil, and lye water (if using) until well combined.
2. Add the Flour: Gently sift the all-purpose flour into the wet mixture. Use a spatula or your hands to bring the mixture together until a soft, slightly sticky dough forms.
3. Rest is Best: Wrap the dough tightly in plastic wrap and let it rest at room temperature for at least 1 hour, or up to 24 hours in the fridge. This resting period allows the flour to fully hydrate, making the dough easier to handle and giving you that perfect soft crust.
Part 2: Preparing the Filling (The “Moon”)
1. Portion the Paste: Divide your lotus seed paste into equal portions based on your mold size. A general rule for a 100g mooncake is 70g of filling and 30g of dough.
2. Wrap the Yolk (If Using): If you are using salted egg yolks, quickly rinse them and pat them dry. Take a small amount of filling, flatten it into a thin disk in your palm, place one yolk in the center, and carefully wrap the paste around the yolk, ensuring it is completely sealed.
3. Weigh and Roll: Roll each portion of filling (whether it contains a yolk or not) into a neat, smooth ball.
Part 3: Assembly and Molding
1. Portion the Dough: Divide your rested dough into the required portions (e.g., 30g for a 100g cake). Roll each piece into a smooth ball.
2. Encasing the Filling: Take one dough ball and gently flatten it into a disk using your palm. Make sure the edges are slightly thinner than the center. Place a filling ball in the center.
3. The Pinch Method: Slowly bring the edges of the dough up and around the filling, pinching firmly to seal the seam completely. Roll gently between your palms to form a smooth sphere again. This step is crucial for avoiding cracks!
4. Molding: Lightly dust your mooncake mold with flour (shaking off any excess). Place the dough ball inside the mold, seam-side down. Press down firmly and evenly on the mold handle. Gently push the mold onto a baking sheet lined with parchment paper to release the imprinted mooncake. Repeat until all are molded.
Part 4: Baking and Glazing
1. Preheat: Preheat your oven to 350°F (175°C).
2. First Bake: Bake the mooncakes for 8 minutes. This “sets” the shape. Remove them from the oven.
3. The First Glaze: Whisk together your egg yolk and water/milk. Using a very soft, fine-tipped brush, lightly brush the glaze only over the raised patterns of the mooncakes. Do not let the glaze pool in the crevices, or the patterns will disappear!
4. Second Bake: Return the mooncakes to the oven for another 5 minutes.
5. Final Glaze & Finish: Apply a very thin second coat of egg wash over the entire surface. Return to the oven for 5-7 minutes, or until the crust is a beautiful golden-brown color.
6. Cooling and Conditioning: Let the mooncakes cool completely on a wire rack. They will look pale and hard when they come out. Don’t panic! True Cantonese mooncakes need 1 to 3 days at room temperature (stored loosely covered) for the oil from the filling to “bloom” into the crust—this process is called Hui You (回油), making them soft, moist, and beautifully shiny.
Serving Suggestions
Mooncakes are rich and dense, meant to be savored slowly.
Serve them cut into thin wedges alongside hot, unsweetened Chinese tea, such as Oolong or Pu-erh. The bitterness of the tea perfectly cuts through the sweetness of the paste. Enjoy them during family gatherings while admiring the full moon!
Tips for Customization & Variations
- Use Different Fillings: Swap the lotus paste for sweet potato paste, brown sugar paste, or even chocolate ganache for a modern twist!
- Vegan Option: Skip the salted egg yolks and substitute them with pumpkin seeds or candied winter melon cubes for texture. Ensure your golden syrup is vegan-friendly (most are, but check if using honey).
- Don’t Over-Glaze: I cannot stress this enough! Less glaze is more beautiful. Think of it as painting a watercolor, not dunking a doughnut!
Nutritional Information (Estimated Per 100g Cake with Yolk)
Please note: This is a very rough estimate, as ingredients vary.
Calories: 400-450 kcal
Fat: 18-22g
Carbohydrates: 55-65g
Protein: 8-10g
These are treats, not everyday snacks, so enjoy responsibly!
Frequently Asked Questions (FAQs)
Q1: Why are my mooncakes cracking in the oven?
A: This usually means two things: either your filling wasn’t sealed well, leaving air pockets, or the dough wasn’t rested long enough, making it brittle. Make sure the dough-to-filling ratio is right (more filling means more stress on the thin crust).
Q2: Can I skip the Golden Syrup?
A: Technically, yes, but you will lose the signature deep golden color and the crust won’t have the right soft, slightly chewy texture. Golden syrup is vital for authentic Cantonese mooncakes.
Q3: How long do homemade mooncakes last?
A: Once fully conditioned (after 2-3 days), if kept in an airtight container at cool room temperature, they can last 1-2 weeks. If they contain salted egg yolks, it’s best to eat them within 10 days.
Q4: My mold isn’t releasing the cake easily. What do I do?
A: Ensure you dust the mold thoroughly with flour before placing the dough ball inside. After pressing, gently turn the mold over, tap it lightly on your counter, and then press the handle gently to release.