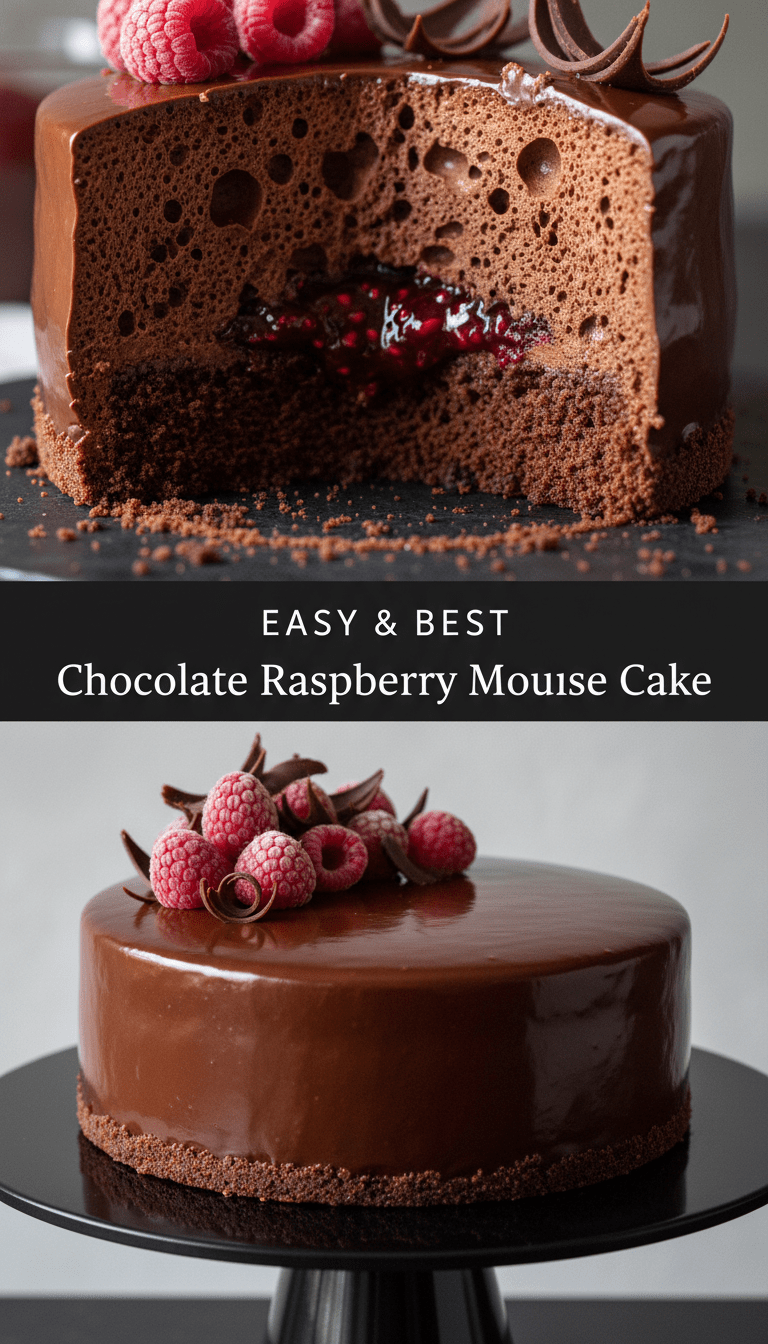
Hey everyone, and welcome back to my kitchen! If you’ve been craving a dessert that screams elegance but whispers “I was so easy to make,” then you have hit the jackpot today. We are diving headfirst into the velvety smooth world of the Chocolate Raspberry Mousse Cake.
This cake is layers of pure bliss—a crunchy chocolate base, rich, airy dark chocolate mousse, and a tart, beautiful raspberry topping. Best of all? We’re keeping things simple with no oven time required for the mousse! Grab your whisks; it’s time to make magic happen.
Quick Facts for Your Kitchen Calendar
Here’s what you need to know before you start whipping:
Prep time: 45 minutes
Chill time: At least 6 hours (or overnight!)
Total time: About 7 hours (mostly hands-off chilling)
Serving size: 10 generous slices
Why You’ll Love This Recipe
Seriously, what’s not to love?
1. Zero Baking Stress: The base is crushed cookies, and the mousse sets beautifully in the fridge. Perfect for summer or when your oven is otherwise occupied!
2. Texture Heaven: You get that satisfying crunch from the base followed by the impossibly light, melt-in-your-mouth chocolate mousse.
3. The Perfect Pairing: Chocolate and raspberry are soulmates. The tartness of the berries cuts through the richness of the dark chocolate perfectly.
4. Looks Expensive: Despite its simplicity, this cake looks like it came straight from a fancy Parisian patisserie.
Ingredients You’ll Need
We’re breaking this down into three parts: the Base, the Mousse, and the Topping.
For the Chocolate Cookie Base:
- 1 ½ cups chocolate wafer cookie crumbs (like Oreos, filling removed, or chocolate graham crackers)
- 6 tablespoons unsalted butter, melted
- 1 tablespoon granulated sugar
For the Dark Chocolate Mousse:
- 1 cup heavy whipping cream (for the chocolate mixture)
- 8 ounces good quality dark chocolate (60-70% cacao), finely chopped
- 2 teaspoons pure vanilla extract
- 1 ½ cups heavy whipping cream (for whipping the final mousse)
For the Raspberry Topping:
- 1 ½ cups fresh or frozen raspberries
- ¼ cup granulated sugar
- 1 tablespoon fresh lemon juice
- 1 teaspoon cornstarch mixed with 1 tablespoon cold water (this is your slurry)
- Extra fresh raspberries and chocolate shavings for garnish
Step-by-Step Instructions: Building the Dream Cake
You will need a 9-inch springform pan for the best results!
Part 1: Creating the Foundation
1. Prep the Pan: Lightly grease the bottom and sides of your 9-inch springform pan. Line the bottom with a circle of parchment paper for easy removal later.
2. Mix the Base: In a medium bowl, combine the cookie crumbs, melted butter, and sugar. Mix until the crumbs are evenly moistened, resembling wet sand.
3. Press Firmly: Pour the mixture into the prepared pan. Use the bottom of a measuring cup or glass to press the crumbs down firmly and evenly across the bottom.
4. Chill Out: Place the base in the freezer while you prepare the mousse—about 15 minutes.
Part 2: Whipping Up the Chocolate Mousse Magic
1. Melt the Chocolate: Place your chopped dark chocolate in a heatproof bowl. In a small saucepan, gently heat 1 cup of heavy cream until it just begins to simmer around the edges. Do not let it boil vigorously!
2. Make the Ganache: Pour the hot cream over the chopped chocolate. Let it sit undisturbed for 5 minutes to melt the chocolate thoroughly. Then, whisk slowly until you have a smooth, shiny ganache. Stir in the vanilla extract and set this aside to cool slightly (it should be warm, not hot).
3. Whip the Mousse Base: In a separate, very clean, large bowl, use an electric mixer to whip the remaining 1 ½ cups of cold heavy cream until stiff peaks form. Be careful not to over-whip!
4. Fold Everything Together: Take about one-third of the whipped cream and gently fold it into the slightly cooled chocolate ganache to lighten it up. Once combined, gently fold the lightened chocolate mixture into the remaining whipped cream until just combined and no white streaks remain. Be gentle here; you want to keep all that lovely air in!
5. Assemble and Chill: Pour the mousse evenly over your chilled cookie base. Smooth the top with an offset spatula. Cover the pan loosely with plastic wrap and refrigerate for a minimum of 6 hours, but ideally overnight, until the mousse is completely set and firm.
Part 3: The Bright Raspberry Finish
1. Cook the Coulis: In a small saucepan, combine the raspberries, sugar, and lemon juice. Cook over medium heat, stirring occasionally, until the berries break down and the mixture simmers (about 5-7 minutes).
2. Thicken: Whisk in the cornstarch slurry. Keep stirring and simmer for 1 minute until the sauce thickens noticeably.
3. Cool Completely: Remove the sauce from the heat and let it cool completely to room temperature. It will thicken more as it cools.
4. Decorate and Serve: Once the mousse cake is firm, carefully run a thin knife around the edge before releasing the springform ring. Spoon the cooled raspberry sauce evenly over the top of the cake. Garnish with fresh raspberries and chocolate shavings.
Serving Suggestions
This cake is rich, so a small slice goes a long way! Serve it chilled, perhaps with a tiny dollop of unsweetened whipped cream on the side to balance the sweetness, or alongside a strong cup of espresso.
Tips for Customization & Variations
- Boozy Kick: Add a tablespoon of good quality raspberry liqueur (like Chambord) to the raspberry sauce after it cools slightly for an adult version.
- Different Base: Try using Biscoff cookies or even thin layers of brownie instead of the chocolate wafer base.
- Milk Chocolate Lovers: If dark chocolate is too intense for you, use 50% milk chocolate, but reduce the added sugar in the base slightly.
- Make it Shiny: For a professional mirror glaze look, skip the simple cooked sauce and search for a chocolate mirror glaze recipe instead!
Estimated Nutritional Information (Per Slice, based on 10 servings)
Please remember these are rough estimates as ingredients vary:
Calories: 450-500
Fat: 35g
Carbohydrates: 35g
Sugar: 25g
Protein: 5g
Frequently Asked Questions (FAQs)
Q: Can I use gelatin instead of relying solely on the whipped cream for the mousse structure?
A: Yes! If you prefer a firmer mousse that sets faster, bloom 1 teaspoon of unflavored gelatin in 3 tablespoons of cold water. Once the chocolate ganache is warm (not hot), stir in the bloomed gelatin until dissolved. Then, proceed with folding in the whipped cream.
Q: My mousse isn’t setting properly. What went wrong?
A: The most common issue is under-whipped cream or folding the chocolate in too aggressively, which deflates the air. Ensure your whipping cream is very cold, and your chocolate ganache is cooled down enough before folding, so it doesn’t melt the whipped cream. Always allow for that 6-hour minimum chill time!
Q: How long will this cake keep in the fridge?
A: Because of the fresh dairy in the mousse, this cake is best enjoyed within 3-4 days. Store it tightly covered in the refrigerator.
Enjoy every silky, fruity, chocolatey bite! Happy baking (or rather, happy no-baking)!